Concrete is one of the most critical material in any construction project as it will determine the structural integrity of a structure. For concrete, the best type to use in projects is a material with developed strength, an adequate amount of moisture for hydration, resistance to freezing and thawing, volume stability, and abrasion and scaling resistance. But how can this be achieved in managing projects in construction? It is through proper curing of concrete.
Curing concrete is identified as providing appropriate moisture, time, and temperature to allow the concrete to obtain the desired properties and quality for its intended use. The process of curing concrete is also essential to ensure the durability and strength development of concrete. This occurs immediately right after concrete placing and finishing and includes maintaining desired temperature and moisture conditions, both at near and depth surface, for extended periods of time.
In today’s blog, we’ll look at the best (and worst) concrete curing practices you can use for your next project, applicable for concrete contractors or even general contractors. If you want to learn something new, read through.

Effects of Improper Curing of Concrete
Following are some of the significant disadvantages of the improper curing of concrete that you want to prevent from happening in your projects. Knowing the consequences and how to avoid them will help streamline your project management for construction when it comes to concreting works.
- The chances of ingress of atmospheric chemicals and chlorides are very high.
- The flexural and compressive strengths are lowered.
- The cracks are formed due to drying shrinkage, plastic shrinkage, and thermal effects.
- The durability of concrete decreases due to high permeability.
- 5. The weathering and frost resistance are decreased.
- The rate of carbonation on the concrete increases.
- The surfaces are coated with dust and sand, and it leads to lower abrasion resistance.
The Dos in Concrete Curing
DO spray your newly poured concrete with water.
The first seven to ten days of curing are crucial for when the strength of the concrete will increase the most. Your fresh concrete mustn’t dry out during this period, especially if it is exposed to direct sunlight.
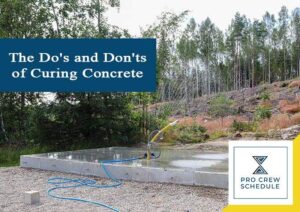
One of the most typical methods for curing concrete is to hose it down with water—five to ten times per day, or as often as you can—for the first seven days. Generally known as “moist curing,” this method allows the moisture trapped in the concrete to evaporate slowly. Moist-cured concrete can be 50 percent stronger than regular concrete, ensuring that it won’t be dampened. However, it is worth note-taking that spraying is not recommended for concrete poured during cold seasons weather. The right construction crew management will help you designate workers and schedule the spraying of concrete for the duration of seven days, also giving you fewer things to worry about.
DO cover newly poured concrete.
Suppose you don’t have time to revisit your concrete with a hose to spray with water for moist curing; another method to use is to use a curing cover that can trap and slow the evaporation of moisture in the concrete mix. The two best options for this task are polyethylene sheeting at least 4mm thick and concrete curing insulating blanket, both available from any DIY and hardware stores.
Before wrapping with any curing cover of your choice, make sure to wet the concrete thoroughly. Ensure that the sheets extend beyond the perimeter of the slab by at least double the slab’s depth. Heavy materials such as bricks and rocks are commonly used to hold the cover in place. Remove the blanket or sheeting daily, wet the concrete again, wet the cover, and repeat for the duration of seven days. Moreover, this curing technique can also be used for vertical walls and columns by soaking them and wrapping them with a curing plastic sheet or blanket.
DO pond cure concrete slabs.
Pond curing is another excellent way to cure concrete, and the process is just how it sounds. Form temporary berms around a newly poured concrete slab, and then flood the area inside with one foot of water. Only three days of pond curing does the work of the seven days of moist curing, and without the daily revisiting— make sure that the water level remains above the concrete slab. If the water drops, it must be continuously refilled. However, this technique does not apply to all types of projects because it will take quite a bit of soil to form the berms around big concrete slabs. Large-scale builders may incorporate this method for their projects to speed up the construction operations when pouring concrete slabs, for example, to get the wall framing of the structure.
DO make the curing process more manageable by using a curing compound.
If the two methods previously discussed are not feasible, here is the simplest solution you can adapt to your concrete curing: curing compounds. These admixtures contain soluble emulsions that create a protective film when sprayed directly on the surfaces of newly poured concrete walls or slabs. Ultimately, the film provides a layer or barrier to prevent water from evaporating, allowing it to take part in the curing process at a consistent rate. These admixtures are available in your local DIY stores, but you can also buy them directly at ready-mix concrete companies.
Some of the curing admixtures are designed to completely disintegrate after a couple of weeks, while others should be scrubbed off once the curing process is complete. Still, other compounds penetrate the curing concrete’s surface, in consequence, becoming a permanents waterproofing sealer of the concrete to keep a freshly-poured look. It is highly encouraging to read the manufacturer’s labels carefully before purchasing a curing compound to make sure it meets your specific needs.
DO a slump test before placing the concrete.
The purpose of the concrete slump test is to measure the consistency of a newly mixed concrete before it sets. Generally, it is performed to check the concrete’s workability to ease the concrete pouring operations. For ready-mixed concrete delivered on-site, a slump test can also be an indicator of an improperly mixed batch to ensure that you have the right type of mix for your structure.
For many years, this test has been used by contractors in the field because of the simplicity of the procedure and the basic apparatus that needs to be used to do it. Make sure always to have one of your workers do this before any concrete pouring occurs and ensure uniformity for different concrete loads under any field condition you may have on-site.

The Don’ts in Concrete Curing
Don’t let fresh concrete get cold.
The ideal time to employ concrete pouring is when the temperatures are expected to be between 10-15°C for five to seven days, but the schedule can go awry when an unexpected cold front arrives. When this happens, the curing objective will shift from keeping the concrete damp to keeping it warm enough to keep the chemical hardening process going. Therefore, your concrete won’t gain strength as quickly.
Concrete insulating blankets should be used in the early two to three days to avoid concrete from getting cold. If you expect the temperature to be higher than 23°C, it is essential to ensure that that slab does not dry out too fast; always keep it hydrated!
Don’t paint or strengthen concrete in the first month.
Any kind of stain or paint applied to concrete when undergoing hardening can be negatively affected by the residual moisture or the change in chemical content in the concrete mixture. Generally, it takes about a full month for the concrete to complete the hydration process, and all the water is used up. Applying paint too soon while the moisture is still rising to the surface may put unnecessary pressure underneath the paint’s hard barrier that would result in the peeling or breaking of the bond.
Consequently, this may also cause the paint to not properly adhere to the concrete that can affect the stained concrete’s final appearance and color.
In order to achieve the best paint finishes, wait until the 28-day curing time before applying stains or paint to your fresh concrete. It’s better to wait than let the two components go to waste.
Don’t put too much weight on new concrete too soon.
With concrete being one of the most robust construction material in a project, it is worth noting that it should not be subjected to excessive weight too soon! The waiting time should be at least 24 hours before allowing light foot traffic on your slab and at least 20 full days before the heavy traffic, such as cars, equipment, machinery, and heavy furniture items, can pass through.
The concrete will indeed harden soon after the pouring, but it is still susceptible to damage due to load strain during the first four weeks of curing. By leaving it for at least 24 hours before allowing foot traffic, including pets, on a freshly poured sidewalk or slab, the concrete will undoubtedly be stronger. Consequently, don’t drive a vehicle on a new driveway or garage for at least ten days. Heavy equipment and vehicle can roll once the concrete achieved its full strength, at around 28 days.